Now you have completed your video. What next? Depending on your audience, there are a number of ways to distribute your video. In other words, there are many ways to get your work out in the world for eyeballs to see. Most of you are looking to get as many views as possible and don’t just expect to have your family and friends watch your video. So in this section, I want to go over the main ways to get your video seen with some tips that will increase the number of views.
First, I want to talk about preparing your video for distribution. This could have been put in the end of the better video editing section as well. Exporting your video the right way is very important. You want your video to be the highest quality possible without the file size being too large. It would take me too long to go through each video editing program and the different export methods, so I’ll give you a few tips that will increase the quality of your video and decrease the size. These are universal tips for whatever program you use.
- Export as a Quicktime Movie. These H264 Codec files are smaller than other file types and still pack a punch with great quality. Whether your program uses the .mov or .mp4 file name doesn’t matter. This is just the container that holds your movie. The real thing to pay attention to is using the H264 codec.
- Export as ACC audio. This will decrease the size of your video compared to WAV and still be great quality.
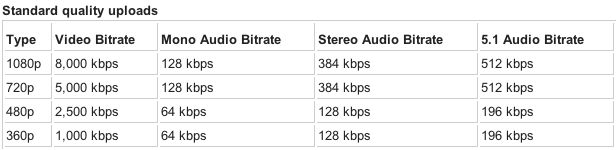
- Change the data rate. Have you ever noticed the ‘limit kbps’ option? This option allows you to limit the data rate of your video. Vimeo suggests setting that option to 5000. This dramatically decreases the file size compared to leaving this section blank. For youtube, this depends on the size of your video. For 1080p, 8000 is the suggested bitrate. For 720p, 5000 is. The reason Vimeo suggests 5000 because as of now, their highest quality is 720p.
Check out this chart below from youtube which gives you a good idea for the suggested data rates:
Once you export your video, you have hundreds of websites to choose from to upload to. But there are basically two that you should be thinking about: YouTube and vimeo. YouTube is the most popular video sharing site – so popular that it has become the second largest search engine in the world, just beneath Google. Youtube has a greater potential for more views because of this, but you can also be lost in a sea of content.Vimeo is the artistic sibling to youtube. Vimeo is meant for creatives who want to share their work with people who will actually appreciate it for its artistic qualities. So don’t expect to get millions of views on Vimeo. However, you will find a more engaged and thoughtful community.

All of that being said, your platform truly depends on what the subject of your video is. Here are a few tips that you should follow to get more views, whether you decide on YouTube or vimeo:
- Proper Titles: Make sure you use your keyword (the main subject of your video) in your title. So if you are making a video about brewing beer, make sure that the words ‘Brewing Beer’ are in your title. Also, the first words in your title count for more SEO (search engine optimization = more views) than the one’s at the end. So front-load your video title with the more important titles. One technique is to search for similar videos and then use similar titles and use it as a template. Also, make sure your title is catchy, something that you would want to click on.
- Write a solid description. YouTube descriptions, while not always read, help a lot when it comes to ranking your video. Make sure to include the keyword within your description – in a natural way. Don’t just repeat ‘brewing beer brewing beer brewing beer…’ YouTube's algorithm is pretty smart and blocks out these spammy videos from ranking well. Include links to your website in your description. Put your most important link at the top so that it automatically shows without the viewer having to click the ‘Show More’ button.
- Tag it correctly! Put your keyword as your first tag, then add any related tags to your video. So for brewing beer your keywords might be: how to brew beer, making beer, beer making, beer brewing, diy beer, how to make beer, IPA, lager, cerveza, etc.
- Share it fast! Youtube likes new videos and will give them a better chance to rank higher when they are first uploaded. So before you upload, plan out how you are going to share – via facebook, emailing your friends, tweeting about it. Talk to fellow bloggers to see if they would share your video once uploaded. Then once you upload it, blast it out to your circle of friends, family, and contacts.
- Use your video as a response to an already popular video. Just go to a video that you like then click to add a comment. Underneath, a ‘Create a video response’ button will pop up. Once you click here you will be able to select one of your uploaded videos or record a new one. By selecting your recently uploaded video, it will show up as one of the video responses underneath the popular video. This will get you more eyeballs viewing your video.
- Encourage interaction. This is probably the biggest and best way to get more views. Unless your video is getting commented on and being shared across the web, you won’t get more views. Unless your video topic automatically lends itself to be sharable and commented on, you need to ask your viewers to do so. Do this in multiple places.
- In the description ask your viewers to comment on something they liked about the video. Ask them to share on facebook.
- Using youtube’s annotations you can ask people to share, subscribe, or continue on to your other videos. This is a great way to get more views.
- If you are making a video where you are the main subject, you can even ask your viewers to share, comment, like within the video itself.
- Then of course when you are posting your video on you facebook wall, tweeting it, etc, ask your followers to comment on it. This will start the conversation and hopefully if you video gets some viral appeal, the comments will flood in.

If you follow all of these tips, I assure you that you will get more views. I’m not promising that you’ll get millions of views and be the next youtube sensation. I am saying that there is a certain process for attaining more views and rushing to put your videos out or slacking on completing your description and adding annotations result in lost views that are incalculable.
There is one other thing that I haven’t talked about that will get more views. That is producing quality videos. Of course there will always be the shaky-cell-phone-camera video of a monkey riding a dog that gets 10 million views. Those always make me wonder, ‘How in the world does that video get THAT many views?!’ If that is the kind of video you want to make, then you’re in the wrong place.
High quality content thrives on the Internet. Whether it is written word, video, or photos, high quality content has absolutely a better chance of getting more views than the same content shot without a tripod, no microphone, poor editing, and lack of lighting. So make sure you follow all of the previous tips to create high quality videos before you post them for the world to see and share.
Comments
Post a Comment